The CBSE SAFAL (Structured Assessment for Analyzing Learning) 2025-26 requires schools to set up a local server infrastructure for conducting online assessments. This comprehensive tutorial provides detailed, step-by-step instructions for installing the SAFAL School Server and conducting assessments smoothly in your school.
Understanding SAFAL Assessment Infrastructure
Before diving into the installation process, it’s essential to understand how SAFAL’s assessment system works. Unlike traditional online exams that require continuous internet connectivity, SAFAL uses a unique School Server architecture that ensures assessments can be conducted even with limited or intermittent internet access.
The SAFAL School Server acts as a local hub within your school’s computer lab. Once the assessment is downloaded and imported to this server, students can take their assessments by connecting to this local server through the school’s internal network. This innovative approach eliminates concerns about internet bandwidth, connectivity issues during examination, and ensures data security.
CBSE Manuals.
System Requirements and Pre-Installation Checklist
Hardware Requirements
Server Machine Specifications: The computer designated as the SAFAL School Server should have adequate processing power and memory to handle multiple student connections simultaneously. While CBSE doesn’t specify exact minimum requirements, a modern computer with at least 8GB RAM and a multi-core processor is recommended.
Computer Lab Setup: Client machines (student computers) should run the latest versions of Google Chrome or Mozilla Firefox browsers. These machines need to be connected to the same local network as the server.
Network Infrastructure: A stable Local Area Network (LAN) connecting the server machine to all client machines in the computer lab is essential. This can be wired or wireless, though wired connections typically offer more stability during assessments.
Software Requirements
Operating System Compatibility: SAFAL School Server supports multiple operating systems including Windows 10 and 11, Windows Server 2019 and 2022, Ubuntu 20.04/22.04/24.04 LTS, and RHEL 9.
Browser Requirements: Google Chrome (latest version) or Mozilla Firefox (latest version) must be installed on both server and client machines.
Internet Connection: Required only on the server machine for downloading the installer, importing assessments, and uploading results. Client machines don’t require internet access.
Pre-Installation Preparation
Before beginning installation, ensure you have:
- School Affiliation Number
- LOC/OASIS password for CBSE portal access
- Administrative privileges on the server machine
- List of students participating in SAFAL assessment
- Designated computer lab with adequate machines
- Network connectivity between all machines
Installing SAFAL School Server on Windows
Step 1: Download the School Server Installer
Begin by accessing the SAFAL Central Portal. Open your web browser and navigate to https://cbsesafal.in. Login using your school’s affiliation number and LOC/OASIS password provided by CBSE.
Once logged in, locate and click on the Installer button on the portal dashboard. This section provides access to the School Server installer compatible with your operating system.
The portal will display an Installer Serial Key. This unique key is crucial for the installation process, so note it down carefully. You can click the copy icon next to the serial key to copy it directly to your clipboard, which will be helpful during installation.
Click on the Windows 64-bit button to download the installer file. The file will be saved to your Downloads folder by default. The installer file typically has a name like “SAFAL-School-Server-Setup.exe” or similar.
Step 2: Begin Installation Process
Navigate to your Downloads folder and locate the downloaded installer file. Double-click the file to initiate the installation process.
Handling Windows Security Warnings: When you first run the installer, Microsoft Defender SmartScreen will display a warning message. This is a standard security feature for applications from unrecognized publishers. Click on the More info link that appears in the SmartScreen dialog.
After clicking “More info,” a Run anyway button will appear at the bottom of the dialog. Click this button to proceed with running the installer. This action confirms that you trust the SAFAL installer and want to continue.
Step 3: Grant Administrative Permissions
The User Account Control (UAC) prompt will appear, asking whether you want to allow this app to make changes to your device. Click Yes to grant the necessary administrative permissions. These permissions are required because the installer needs to write files to system directories and configure network settings.
Step 4: Navigate Installation Wizard
The SAFAL School Server Setup Wizard will launch. Click the Next button on the welcome screen to begin the installation process.
Authentication Screen: You’ll be prompted to enter your School Affiliation Number and the Serial Key you noted earlier. Enter these credentials carefully, ensuring there are no extra spaces or typos. Click Next to verify your installation credentials with CBSE servers.
License Agreement: Read through the SAFAL license agreement displayed on screen. Select the I accept the agreement option and click Next to proceed. You cannot continue installation without accepting these terms.
Installation Location: The installer will suggest a default installation directory, typically in the Program Files folder. Unless you have specific reasons to change this, accept the default location and click Next.
Start Installation: Review the installation settings displayed on the summary screen. Click the Install button to begin copying files and configuring the School Server.
Step 5: Complete Installation
The installation progress bar will show files being copied and configured. This process typically takes 2-5 minutes depending on your system specifications. Wait patiently without interrupting the process.
Once installation completes, click the Finish button to exit the setup wizard. After successful installation, you’ll notice a SAFAL shortcut icon on your Desktop. This icon provides quick access to the SAFAL School Server Manager.
Step 6: Launch School Server Manager
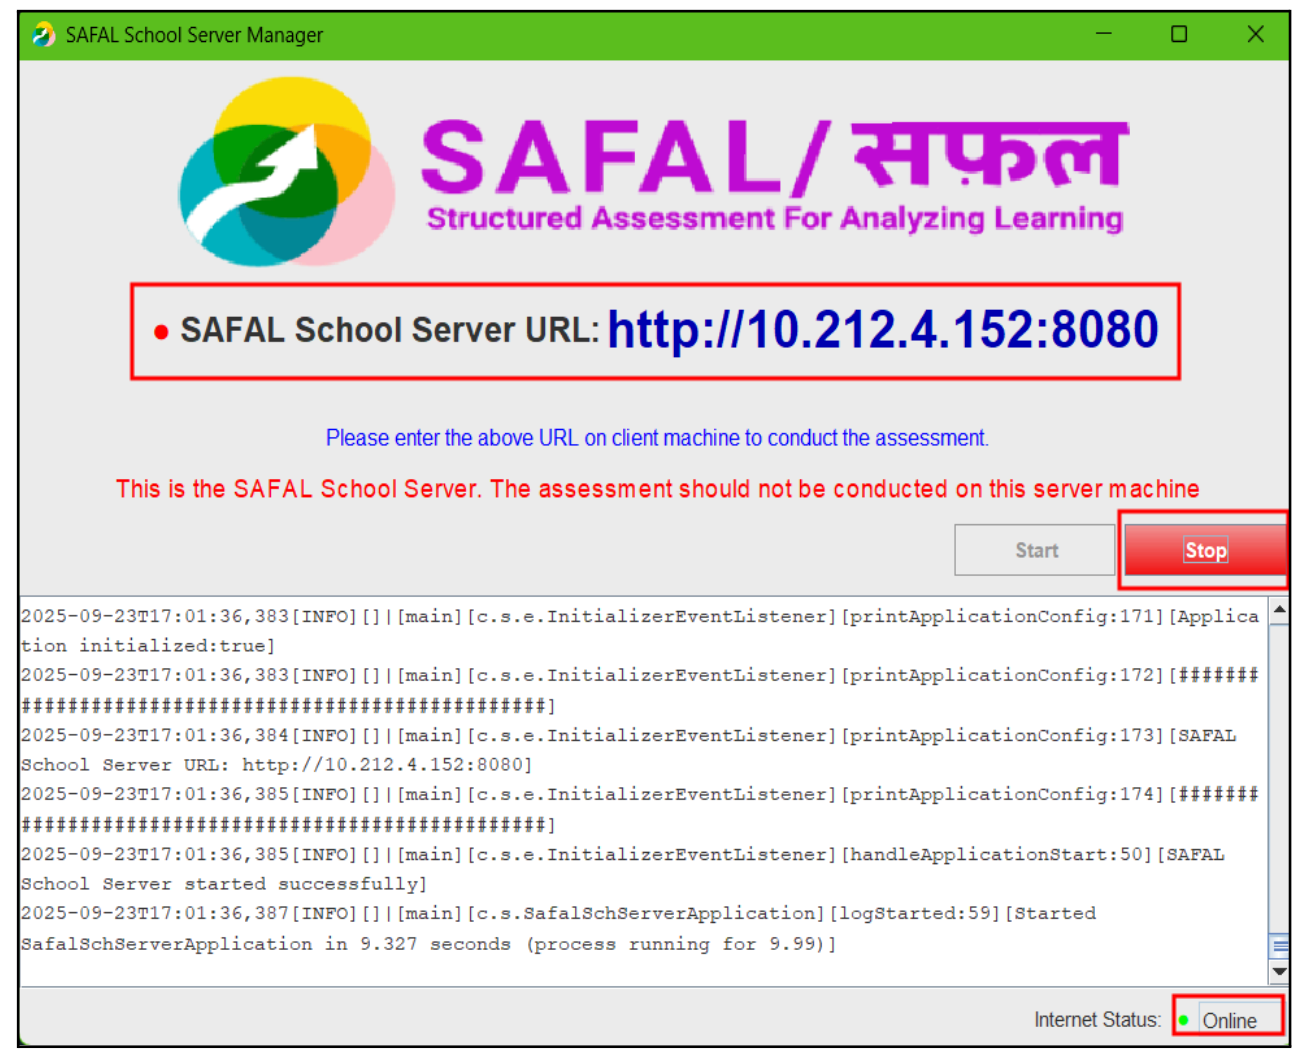
Double-click the SAFAL shortcut icon on your Desktop to launch the SAFAL School Server Manager application. The manager window displays a clean interface with Start and Stop buttons, along with indicators showing your internet connection status.
Starting the Server: Click the Start button to activate the School Server. After a few seconds, the server will start running, and the manager window will display the SAFAL School Server URL. This URL typically looks something like “http://192.168.1.100:8080” or similar, using your server machine’s local IP address.
Important Note: Once the School Server is running, do NOT close the School Server Manager window. The server must remain active throughout the assessment period. Closing this window will stop the server and disconnect all students.
Recording the Server URL: Write down or take a screenshot of the School Server URL displayed in the manager window. You’ll need to share this URL with students so they can access the assessment portal from their lab computers.
Stopping the Server: After completing all scheduled assessments for the day, click the Stop button in the manager window. Confirm your action when prompted. Only stop the server when you’re certain all students have submitted their assessments and results have been uploaded.
Installing SAFAL School Server on Ubuntu Linux
Schools using Ubuntu Linux operating systems can install the SAFAL School Server using the .deb package format. This section covers installation on Ubuntu 20.04, 22.04, and 24.04 LTS versions.
Step 1: Download the Installer Package
Login to the SAFAL Central Portal at https://cbsesafal.in using your school credentials. Navigate to the Installer section and download the appropriate .deb package for Ubuntu. The filename will be similar to “safal-server_1.9.5_amd64_ubuntu-22.04.deb” depending on your Ubuntu version.
Step 2: Open Terminal
Access the Terminal application by either searching for it in your system’s application menu or using the keyboard shortcut Ctrl+Alt+T. The Terminal provides command-line access necessary for installing the package.
Step 3: Navigate to Downloads Directory
Change to the directory where you downloaded the SAFAL School Server package. If the file is in your Downloads folder, use the following command:
cd ~/Downloads
You can verify the file is present by typing ls and pressing Enter, which will list all files in the current directory.
Step 4: Install Dependencies
Before installing the SAFAL School Server package, you need to install required dependencies. Run the following command exactly as shown:
sudo apt install curl iproute2 gawk grep iputils-ping lshw net-tools
Enter your password when prompted. The system will download and install all necessary supporting packages.
Step 5: Remove Old Version (If Applicable)
If you previously installed an older version of SAFAL School Server, you must uninstall it first. Use the following command:
sudo dpkg --purge safal-server
If this is your first installation, this command will simply report that the package isn’t installed, which is fine. Proceed to the next step.
Step 6: Install SAFAL School Server Package
Use the dpkg tool to install the SAFAL package. Replace the filename in the command below with your actual downloaded filename:
sudo dpkg -i safal-server_1.9.5_amd64_ubuntu-22.04.deb
Press Enter and provide your password when requested. The installation process will extract files, configure the server, and set up necessary permissions.
Step 7: Launch the Server
After successful installation, the SAFAL shortcut icon will appear on your Desktop. Double-click this icon to launch the SAFAL School Server Manager, which functions similarly to the Windows version described earlier.
Installing SAFAL School Server on RHEL 9
Red Hat Enterprise Linux (RHEL) 9 users can install SAFAL School Server using the .rpm package format. The process is similar to Ubuntu installation but uses different package management commands.
Step 1: Download and Access Terminal
Download the .rpm package from the SAFAL Central Portal. Open the Terminal using Ctrl+Alt+T or through your application menu.
Step 2: Navigate to Download Location
Change to your Downloads directory:
cd ~/Downloads
Step 3: Install Dependencies
Install required dependencies using the dnf package manager:
sudo dnf install curl iproute gawk grep iputils lshw net-tools libxcrypt
Enter your password and confirm the installation when prompted.
Step 4: Remove Previous Installation
If an older version exists, remove it with:
sudo rpm -e safal-server
Step 5: Install SAFAL Package
Install the SAFAL School Server using either rpm or dnf command. Replace the filename with your actual downloaded file:
Using rpm:
sudo rpm -i safal-server_1.9.5_x86_64_rhel-9.rpm
Or using dnf:
sudo dnf install safal-server_1.9.5_x86_64_rhel-9.rpm
Both commands accomplish the same result; choose whichever you’re more comfortable with.
Step 6: Verify Installation
After installation completes, verify the SAFAL shortcut appears on your Desktop and launch the School Server Manager.
Preparing for Assessment Day
Network Configuration
Ensure all client machines (student computers) can reach the server machine. You can test this by:
- Opening a web browser on any client machine
- Entering the School Server URL (noted from the manager window)
- Verifying that the SAFAL login page loads correctly
If the page doesn’t load, check network cables, router configurations, and firewall settings that might block internal network traffic.
Student Registration and Roll List
Login to the School Portal using the School Server URL on the server machine itself. Navigate to the Assessment tab to view all scheduled SAFAL 2025-26 assessments. Verify that your student roll list is complete and accurate. This information determines which students can login and appear in the system.
Understanding Assessment Components
Each assessment batch has several critical components:
Roll List: The complete list of students registered for the assessment, with their assigned User IDs.
Assessment PIN: A unique numeric code required for students to start their assessment attempt. This PIN ensures controlled access and prevents premature starts.
Login Credentials: Each student receives a unique User ID and Password for accessing the system.
Batch Organization: Assessments are organized into batches, allowing schools to conduct assessments for different groups at different times if needed.
Importing Assessment Data
Step 1: Access School Portal
Open Google Chrome or Mozilla Firefox on the server machine. Enter the School Server URL in the address bar and press Enter. The SAFAL School Portal login page will appear.
Step 2: Login to Portal
Enter your school’s Affiliation Number in the designated field. Input your LOC/OASIS password in the password field. Click the login button to access the portal dashboard.
Step 3: Navigate to Assessment Section
Click on the Assessment tab on the Home page. This section displays all scheduled SAFAL 2025-26 assessments for your school. You’ll see assessment details including subject, class, date, and batch information.
Step 4: Import Assessment
Locate the scheduled assessment you want to conduct. Click the Import button next to the assessment entry. A dialog box will appear displaying the SAFAL undertaking—important terms and conditions regarding assessment conduct and data handling.
Read the undertaking carefully and check the agreement box. Click Import Assessment to begin downloading the assessment content to your School Server.
Step 5: Wait for Confirmation
The import process downloads encrypted question papers, student data, and assessment configurations. This may take several minutes depending on your internet speed and assessment size. Do not close the browser or navigate away during this process.
Wait until you receive the “Assessment imported successfully” message. This confirmation indicates that all assessment data is now stored on your local School Server and ready for conduction.
Step 6: Verify Login Details
After successful import, the system generates login credentials for all participating students. Click the Login Details button to view and download these credentials. You can typically export this information as a PDF or Excel file for easy distribution to students.
Conducting the Assessment
Teacher/Examiner Preparation
Lab Setup Verification: Before students arrive, ensure all client machines are powered on, connected to the network, and have browsers open to the School Server URL. Test login functionality on at least one machine to confirm everything works correctly.
Accessing Student Credentials: From the server machine’s School Portal, click the Login Details button for the specific assessment batch you’re conducting. This displays all student User IDs and Passwords. Print this information or display it in a way that allows you to distribute credentials to students.
Retrieving Assessment PIN: Click the eye icon next to the respective assessment batch to reveal the Assessment PIN. Write this PIN on a whiteboard or prepare to announce it to students. Do not share the PIN until all students are logged in and ready to begin.
Seating Arrangement: Assign students to specific computers and provide each student with their unique login credentials. Ensure students understand they should only use their assigned credentials.
Starting the Assessment Batch
Before clicking the Start button, complete this final checklist:
- All students are seated at their assigned machines
- Each student has received their User ID and Password
- Students have successfully logged into the School Portal
- All students can see the Assessment tab and their scheduled assessment
- Internet connectivity on server machine is stable (for session monitoring)
Once everything is confirmed, click the Start button next to the assessment batch in the School Portal on the server machine. This action activates the assessment and makes it available for student access.
Announce the Assessment PIN to all students. They’ll need this PIN to begin their actual assessment attempt.
Student Assessment Process
Step 1: Student Login: Students open the School Portal URL on their client machines and enter their provided User ID and Password. They should verify they’re logged in successfully by seeing their name displayed in the portal.
Step 2: Navigate to Assessment: Students click on the Assessment tab on the School Portal home page. They’ll see their scheduled assessment listed with a Start button.
Step 3: Begin Assessment: Students click the Start button next to their assessment. A dialog box appears requesting the Assessment PIN.
Step 4: Enter PIN and Start: Students enter the Assessment PIN announced by the teacher/examiner and click Start Assessment. The assessment interface loads, displaying the first question.
Step 5: Complete Assessment: Students navigate through questions using Next and Previous buttons, can flag questions for review, and can change answers before submission. The interface typically displays a timer showing remaining time.
Step 6: Submit Assessment: After completing all questions or when time expires, students click the Submit button. A confirmation dialog appears requiring students to confirm their submission. Once confirmed, the assessment is submitted and cannot be reopened.
Monitoring During Assessment
Throughout the assessment, teachers/examiners should:
Monitor Student Progress: Periodically check the server portal dashboard which may show how many students have started, are in progress, or have submitted.
Handle Technical Issues: If a student experiences technical problems (browser crash, network disconnection), consult CBSE guidelines for handling such situations. Generally, students can re-login and continue from where they left off.
Maintain Exam Discipline: Ensure students work independently, don’t communicate with each other, and follow all examination protocols.
Time Management: Keep track of assessment duration and provide time warnings to students (e.g., “10 minutes remaining”).
Ending the Assessment
Pre-End Assessment Verification
Before ending an assessment batch, verify the following critical points:
All Submissions Complete: Check that all students who were present have submitted their assessments. The portal typically shows submission status for each student. Any student who hasn’t submitted will lose their work once you end the assessment.
Technical Issues Resolved: Ensure any students who experienced technical difficulties have been able to complete and submit their assessments appropriately.
Data Integrity Check: Verify on the server portal that the expected number of submissions matches the number of students who appeared for the assessment.
Ending Process
Navigate to the Assessment tab on the School Portal (server machine). Locate the assessment batch you wish to end from the list of available batches. Click the End button corresponding to the assessment batch.
A confirmation dialog appears asking you to confirm that you want to end the assessment. This action is typically irreversible, so ensure everything is in order before proceeding. Click Confirm or Yes to proceed with ending the assessment.
The system processes the end request, finalizes all submissions, and prepares data for upload. Wait until you receive a successful end exam message. This confirmation indicates that the assessment batch has been properly closed.
Post-Assessment Data Upload
After ending the assessment, the School Server automatically prepares assessment responses for upload to CBSE servers. This process requires internet connectivity on the server machine.
The server portal typically shows upload status, indicating whether responses have been successfully transmitted to CBSE. Verify that the upload completes successfully—this is crucial as CBSE requires this data for assessment evaluation and report generation.
If upload fails due to connectivity issues, the system usually queues the data for automatic upload once internet connection is restored. However, verify successful upload before proceeding to the next batch or shutting down the server.
Troubleshooting Common Issues
Installation Problems
Installer Won’t Run on Windows: If Microsoft Defender or antivirus software blocks the installer, temporarily disable real-time protection, run the installer, then re-enable protection. Ensure you’re downloading the installer from the official CBSE SAFAL portal only.
Serial Key Validation Fails: Double-check that you’ve entered the School Affiliation Number and Serial Key exactly as provided, with no extra spaces. Ensure internet connectivity during this verification step. If problems persist, contact CBSE technical support.
Linux Installation Errors: If dependency installation fails, update your package repositories first using sudo apt update (Ubuntu) or sudo dnf update (RHEL), then retry installing dependencies and the SAFAL package.
Server Connectivity Issues
Client Machines Can’t Access Server URL: Verify all machines are on the same network. Check that firewalls on both server and client machines aren’t blocking connections. Try accessing the server using its IP address directly if the displayed URL doesn’t work.
Server URL Not Displaying: Ensure the Start button was clicked in the School Server Manager. Check that no other application is using the port SAFAL requires (typically port 8080). Restart the server machine if necessary.
Assessment Conduction Problems
Students Can’t Login: Verify credentials are entered correctly with no extra spaces. Check that the assessment batch has been imported successfully. Ensure the assessment batch has been started by the teacher from the server portal.
Assessment PIN Not Working: Verify you’re using the correct PIN for the specific batch being conducted. PINs are batch-specific and time-sensitive. Click the eye icon again to confirm the correct PIN.
Student Assessment Disconnects: If a student’s assessment disconnects, they should be able to re-login using the same credentials and continue. Their progress should be saved. If this doesn’t work, consult CBSE emergency protocols.
Cannot End Assessment: Ensure all active student sessions are completed or closed. Check internet connectivity on the server machine. Try refreshing the browser page and attempting to end again.
Technical Support Resources
For unresolved technical issues:
CBSE SAFAL Help Desk: Contact through the official CBSE portal or dedicated SAFAL support channels. Support contact information is typically available in the School Portal under Help or Support sections.
Regional CBSE Offices: Your regional CBSE office can provide guidance and technical support for SAFAL implementation.
Online Resources: The CBSE SAFAL website (https://cbsesafal.in) contains FAQs, troubleshooting guides, and video tutorials.
School IT Coordinator: Leverage your school’s IT staff or coordinator who may have experience with SAFAL from previous years or training sessions.
Best Practices for Smooth Assessment Conduction
Pre-Assessment Day Preparation
Conduct Trial Runs: Days before the actual assessment, conduct a complete trial run with a few students. This helps identify and resolve technical issues in advance.
Infrastructure Testing: Test the entire setup including server installation, network connectivity, browser compatibility, and student login process well before assessment day.
Backup Plans: Prepare contingency plans for power failures (UPS systems), internet outages (mobile hotspot backup), and hardware failures (spare computers identified and configured).
Staff Training: Ensure all staff involved in assessment conduction understand their roles, are familiar with the School Server interface, and know how to handle common issues.
Assessment Day Protocols
Early Arrival: IT staff and examiners should arrive early to power up systems, start the School Server, and verify all connections are functioning.
Staggered Entry: If conducting multiple batches, allow adequate time between batches for proper ending of previous batch, verification of data upload, and preparation for the next batch.
Clear Communication: Provide clear instructions to students about login procedures, Assessment PIN entry, navigation within the assessment, and submission process.
Documentation: Maintain records of any technical issues encountered, how they were resolved, student-wise submission status, and any irregularities that occurred.
Post-Assessment Procedures
Data Verification: After each assessment session, verify that response data has been successfully uploaded to CBSE servers. Keep screenshots or records of confirmation messages.
Server Backup: If you have multiple assessment days, keep the School Server running between sessions or properly shut down and restart as needed, following CBSE guidelines.
Feedback Collection: Gather feedback from students and staff about the assessment experience to improve future sessions.
Incident Reporting: Report any significant technical issues or irregularities to CBSE through proper channels as per their guidelines.
Security and Data Privacy Considerations
The SAFAL assessment system incorporates several security measures to protect assessment integrity and student data:
Encrypted Data Transfer: Assessment content is encrypted during download from CBSE servers to your School Server, ensuring question papers remain secure.
Controlled Access: The Assessment PIN system ensures students can only begin assessments at the designated time when the examiner initiates the batch.
Local Server Architecture: By keeping assessment data on a local server during conduction, SAFAL minimizes exposure to internet-based security threats.
Secure Submission: Student responses are encrypted before being uploaded to CBSE servers, protecting answer data during transmission.
Schools should complement these built-in security features by:
- Restricting physical access to the server machine during assessments
- Ensuring only authorized personnel have login credentials to the School Portal
- Maintaining the confidentiality of Assessment PINs until the appropriate time
- Following CBSE protocols for handling any technical irregularities
Conclusion
Successfully installing and conducting CBSE SAFAL 2025-26 assessments requires careful preparation, attention to technical details, and proper execution of each step. This tutorial has provided comprehensive instructions covering installation on Windows, Ubuntu Linux, and RHEL operating systems, along with detailed procedures for importing assessments, conducting them smoothly, and handling common challenges.
The key to success lies in thorough preparation before assessment day. By testing your infrastructure, training staff, and familiarizing yourself with the School Server interface, you can ensure students have a smooth, stress-free assessment experience. Remember that SAFAL’s local server architecture is designed to make conduction reliable even in challenging network conditions, provided the initial setup is done correctly.
Always refer to official CBSE communications for the latest updates, as procedures and software versions may be updated. The CBSE SAFAL portal at https://cbsesafal.in remains your primary resource for downloading the latest installer versions, accessing support materials, and receiving official guidance.
By following this comprehensive tutorial, schools can confidently implement SAFAL assessments, contributing to CBSE’s vision of competency-based evaluation and supporting students’ learning journeys effectively.